
Keeping my knives sharp is a matter of personal pride. Whipping out a knife that cuts through simple tasks like it doesn’t even know it’s doing work gives me a warm, fuzzy feeling inside. Getting that laser-sharp edge took a lot of practice, and my share of trial and error, as well as a few tools to help make the job infinitely easier. I hope to pass this knowledge on to you, gentle reader, so that we can all have knives worthy of cutting cardboard, hamburger, and craft materials alike.
First off, and this is probably the most complicated part of the process, is you’ll want a sharpening kit that has some form of angle guide. The importance of this can’t be stressed enough. Sharpening freehand on a stone requires a lot more practice than I have time for, and while I can get a decent edge on a stone with no angle guide, it’s never anywhere near as sharp as when I have my complete kit.
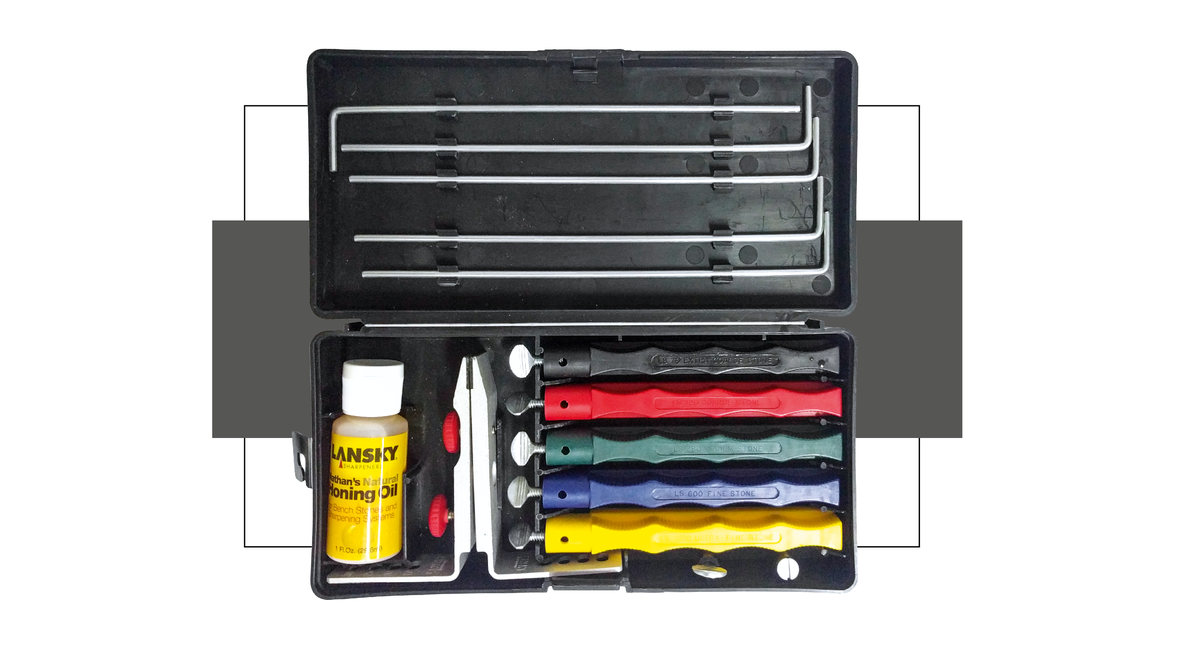
My weapon of choice is the Lansky Sharpening System. Depending on the kit, this will include stones of varying grit, and an angle guide, so you can keep the angle of each stroke perfectly consistent. More than almost anything, is key to getting a very sharp edge on your blade. There are other great options out there, and I have tried a few, but this is what I happen to have, so I’ll stick with it. The main reason I have this is for a constant angle, so it shouldn’t matter what you use (even freehand), as long as you have the same angle for every stroke of the stone on the steel.
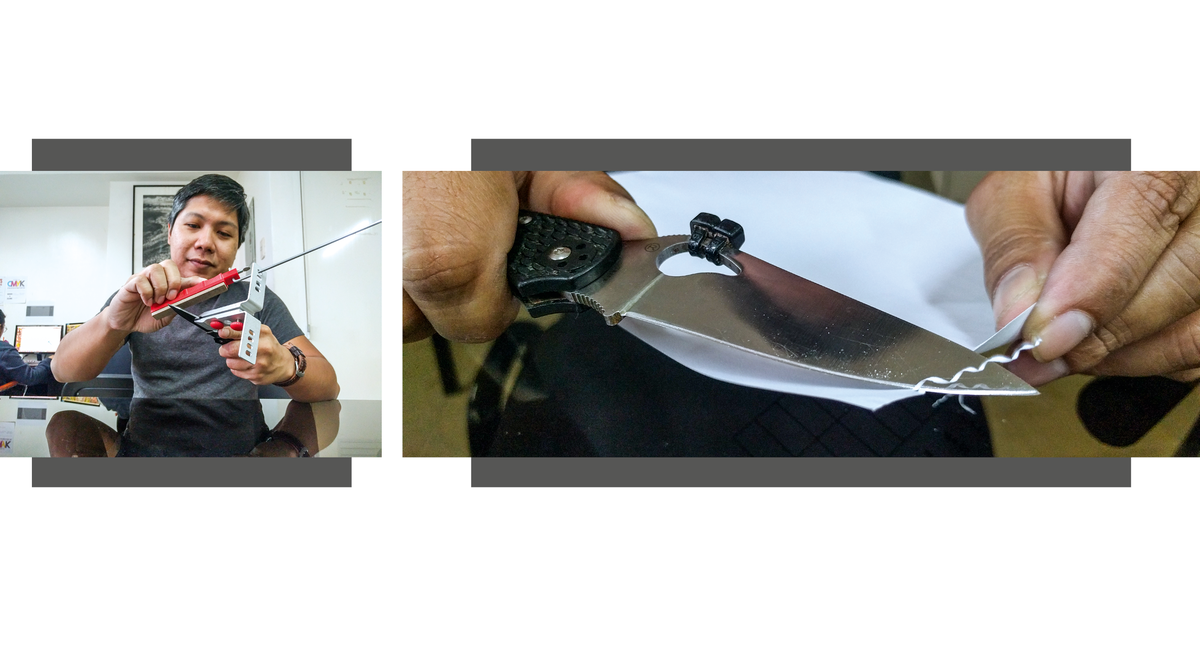
The first thing I do when getting ready to sharpen my knife is to check if there is any one area that will need particular attention. Maybe there is a small chip, or a spot whose edge is rolled over. If any area needs extra seeing to, I take note of it for later. The knife then goes into the Lansky system’s clamp, after which, I draw on the very edge with a marker, for reasons I will get into shortly.
Now, depending on the wear on the knife, I’ll either go with an appropriate grit of stone. Too coarse, and you’ll be removing more material than necessary, and adding an extra step to the whole process. Too fine, and you’ll be at it all day, wearing your smoother stones out in the process. This is something you’ll be able to tell from experience, but if you must, you might as well go too rough than not rough enough.
Now, remember how we drew on the edge of the knife with a marker? This is so we know we have the right angle when we start sharpening. Hold the stone against the edge of the knife and make sure the very edge is resting on the flat of the stone. Draw the stone against the edge of the knife, as if you were taking thin slices off the stone with the blade. After one pass, you can check if your angle is right based on what you’ve scraped off. What you’re after is marker removed from the whole primary bevel (the actual edge of the knife). If there’s still marker at the edge, raise the spine a bit more during the stroke. If there’s no marker at the edge, but still some by the shoulder, drop the spine on the next pass. Once you have your angle right, keep it that way for every pass, and you’re on your way.

“But Ren,” you might ask, “how do i know when to stop?” I’m glad you asked. Keep going, with moderate pressure (more than the weight of the knife, but not bearing down on the blade), until you raise a burr on the opposite side of the blade.Basically, you remove material on the side you’re attacking, and causing the very tip of the blade to fold over to the other side. You’ll know you’ve done so once you can feel the rough, jagged material on the very edge opposite the one you’ve been sharpening. Once you can feel it, start working on the side with the burr. Keep going until you once again knock the burr over to the opposite side. If there is one thing you should focus on, it should be keeping that angle consistent; otherwise, you’ll either be making the knife duller, or scraping away, making no progress at all. Once you get that burr over, it’s time to switch to the next smoother stone, and repeat the process.
Remember, you want a consistent angle, a fair amount of pressure. Keep going until you can feel the burr move to the other side, then switch to the next smoother stone. Basically, keep going until you’re out of smoother stones.
It’s not going to be a fixed number of strokes per side, or alternating sides every stroke, or anything like that. The key here is raising the burr, and knocking it over to the other side. The key to that is a consistent angle and consistent pressure. And lots of patience. What you’re doing is a lot like sanding wood: you’re scratching away material with your current grit, and then scratching out the marks left by that grit, through the use of the next smoother stone. Simple on paper, but it takes some practice to master. Take note that some materials, like ceramic, won’t develop a burr, and others, like titanium and some of the harder steels, will take a long time to sharpen.

Now, on to a few details.
I have tried using circular strokes, and strokes in one direction, into the edge. Both seem to work reasonably well, but I tend to prefer strokes in one direction, because it makes more sense to me to consistently cut into the edge.
Some kits come with honing oil, for use during sharpening. I have likewise tried it dry and oiled, and find that there isn’t any appreciable difference; however, if you use oil on the stones, you’re going to have to always use oil, so knowing this, I choose to keep my stones dry.
It’s good practice to clean the stones after use, as the pores can get clogged up with metal, causing them to lose their bite, and be much less effective. Soapy water, your bare fingers, and some elbow grease make short work of dirty stones. Clean stones make quick work of dull knives, so keep ‘em clean.
Once I finish with the last stone, I move over to a leather strop loaded with metal polish. On the strop, drop the pressure to about the weight of the knife. Too much, and you’ll feed the edge into the leather and dull the edge. Remember to continue to keep the correct angle, otherwise, you’ll undo all your hard work. As long as you keel the right pressure and angle, don’t worry about it, as you can’t really over-strop. You can keep going until you get a mirror finish, and that’ll be fine.
To check your work, you can take your freshly sharpened blade, and lay it at a 90-degree angle on the barrel of a plastic pen (think a Sharpie). If you apply a bit of sideways pressure on the blade, and it doesn’t budge against the weight of the knife on the pen, you’ve nailed it.
There are many more nuances to the process as a whole, but this should get you started on the way to sharpening your knives. There are different blade profiles that require different methods, but for the usual knives we see and carry, this should do you right. Take your time, and practice. I ruined my share of blades getting the process right, but on the bright side, those knives I messed up eventually got re-sharpened to an edge much better than stock.
Also published in GADGETS MAGAZINE May 2017 issue
Words by Ren Alcantara